Making custom wall shelves is a practical way to maximize space and add a personalized touch to any room. The key to successful custom shelves is selecting the right materials, measuring accurately, and using secure mounting techniques. With the right approach, anyone can create shelves that suit their style and storage needs.
This process involves choosing shelf design, cutting materials to size, assembling the pieces, and installing them securely on the wall. Understanding basic tools and safety measures ensures a smooth build.
Whether you want simple floating shelves or more intricate designs, these steps cover what you need to get started confidently. Custom shelves can be both functional and decorative when done correctly.
Planning Your Custom Wall Shelves
Effective planning involves understanding the shelf’s function, accurately measuring the available space, and selecting suitable dimensions to ensure both practicality and aesthetics. Each step shapes the overall design and usability of the shelves.
Determining Shelf Purpose and Location
Identify what you will store or display on the shelves. Will they hold heavy books, decorative items, or lightweight objects? This influences material choice and mounting method.
Next, choose the wall area based on visibility and access. Avoid placing shelves where they may obstruct doors or windows. Consider wall strength—studs or masonry can support heavier loads.
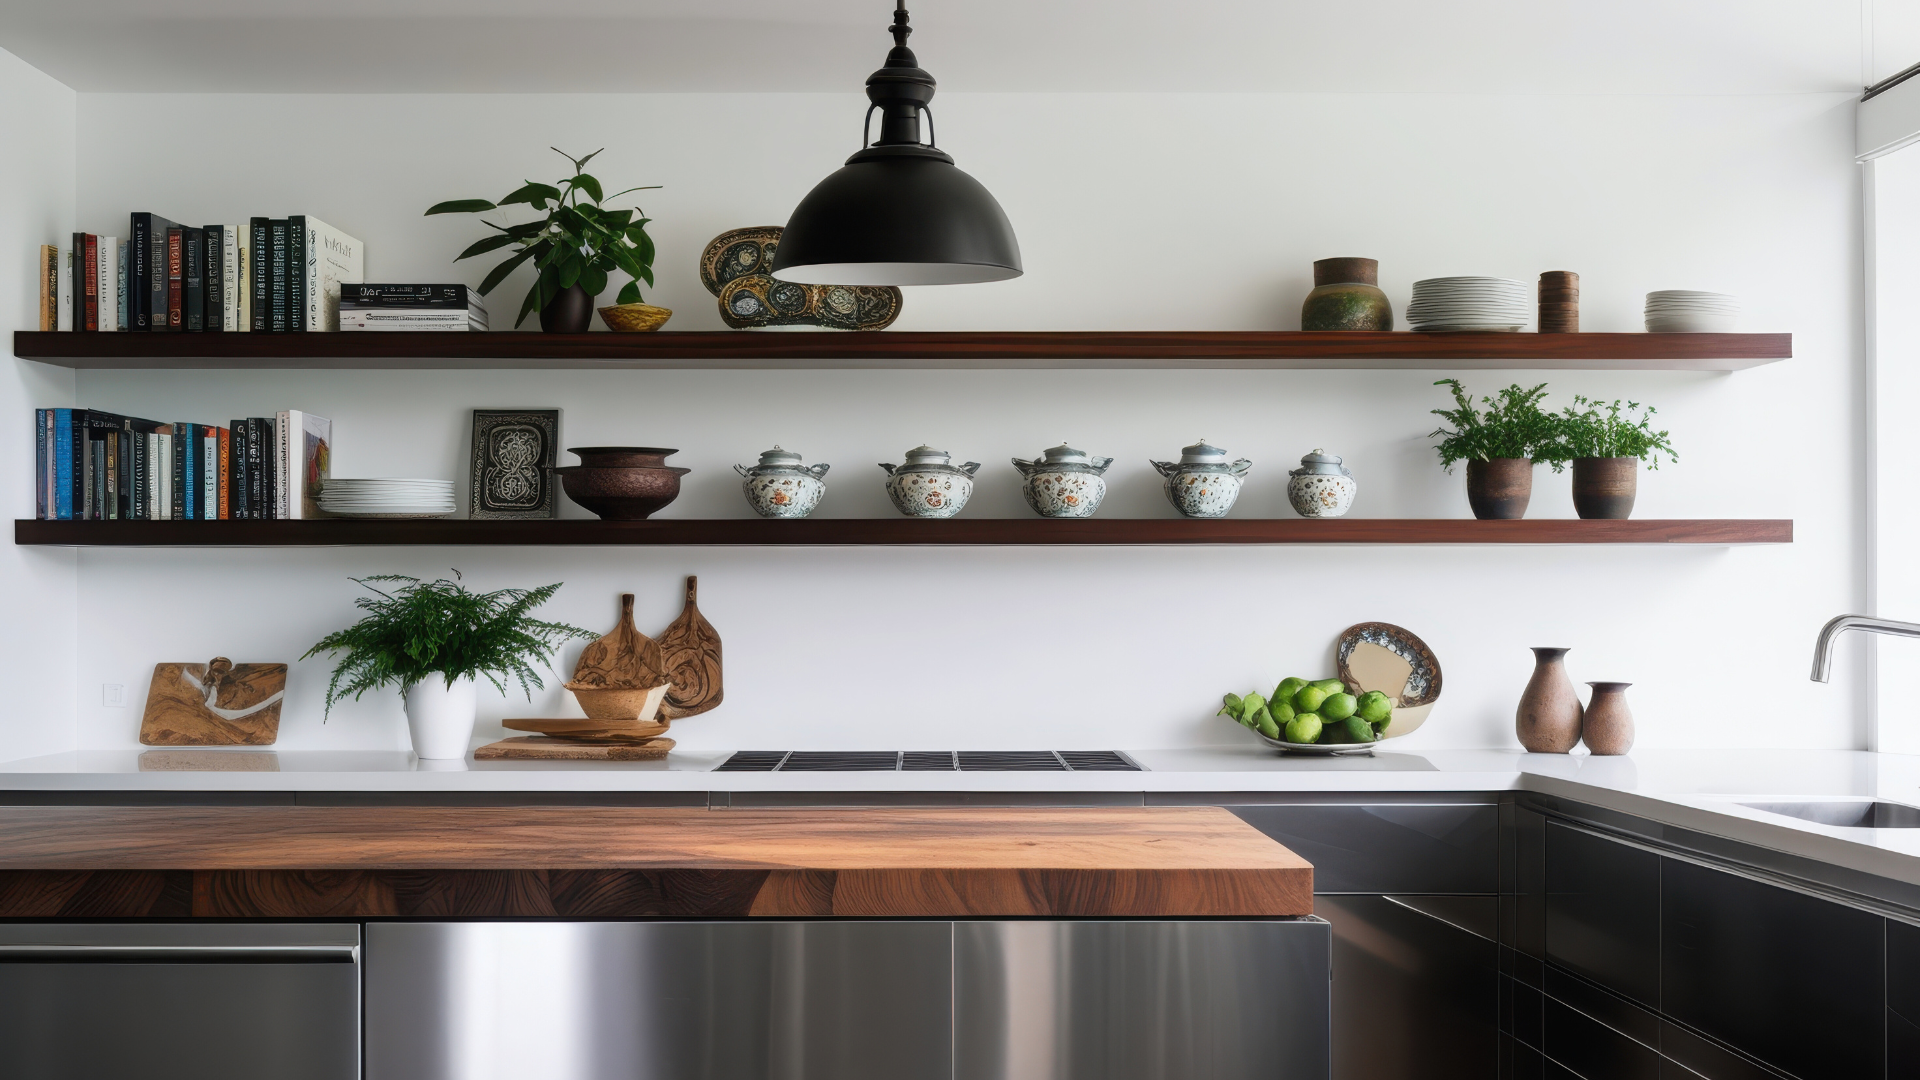
Think about the room’s style. Shelves in a kitchen differ from those in a home office or living room. Functionality and appearance should align with the space’s needs and design.
Measuring Wall Space Accurately
Use a tape measure and level to get precise wall dimensions. Measure the height, length, and depth where the shelves will go.
Mark wall studs with a stud finder to ensure secure mounting points. Shelves fixed only on drywall risk falling due to the weight.
Take note of nearby fixtures like light switches and outlets. This avoids interference with installation and use.
Record all measurements clearly. Double-check before cutting materials or ordering shelving components.
Choosing Shelf Size and Dimensions
Base shelf width and depth on item size and wall space. Standard depths range from 6 to 12 inches; adjust to suit books, dishes, or decor pieces.
The height between shelves depends on what you plan to store—about 8-12 inches for books, more for larger objects.
Balance proportions to avoid overcrowding the wall or looking sparse. Use an easy-to-read chart:
| Shelf Purpose | Depth | Height Between Shelves |
| Books | 10-12 inches | 10-12 inches |
| Decorative Items | 6-10 inches | 8-10 inches |
| Kitchen Storage | 8-12 inches | 12-15 inches |
Confirm dimensions fit with both wall space and functional needs before proceeding.
Selecting Materials for Wall Shelves
Choosing the right materials affects both the shelf’s function and style. Factors such as strength, appearance, environmental impact, and weight capacity all play key roles.
Comparing Wood, Metal, and Alternative Options
Wood is a popular choice for its natural look and ease of customization. Common woods include pine, oak, and plywood. Pine is affordable and lightweight but less durable. Oak offers strength and a rich grain, but costs more. Plywood balances stability and cost, making it ideal for painted finishes.
Metal shelves, often made from steel or aluminum, provide high strength and modern aesthetics. Steel is strong but heavy and prone to rust if untreated. Aluminum is lighter and resistant to corrosion, but can be less sturdy under heavy loads.
Alternative materials like glass and plastic add a unique style but usually require careful handling. Glass offers a sleek look but breaks easily. Plastic can be lightweight but may not hold much weight.
Evaluating Durability and Weight Limits
Durability depends on material density and construction. Solid hardwood supports heavy loads well, typically up to 50 pounds per linear foot if properly installed. Plywood’s layered structure resists warping but varies widely by thickness.
Metal shelves support high weights, often exceeding 100 pounds per foot when mounted correctly. Steel brackets and frames increase load capacity significantly.
Weight limits are also affected by hardware and wall type. Drywall anchors may reduce capacity drastically compared to mounting on studs or masonry. Always match material strength with the desired shelf use.
Eco-Friendly and Sustainable Material Choices
For sustainability, look for FSC-certified wood or reclaimed lumber. FSC certification ensures responsible forest management. Reclaimed wood gives new life to old materials but may need extra treatment.
Bamboo is a fast-growing, renewable alternative with hardwood-like strength. It’s less water-intensive and resists pests naturally.
Recycled metal also reduces environmental impact, especially aluminum with high recyclability. Avoid plastics derived from non-recyclable or single-use sources to minimize waste.
Design Ideas for Custom Wall Shelving
Custom wall shelves can vary widely in style, support, shape, and finish, each influencing both function and aesthetic. Options range from minimalist floating designs to bold, creative layouts that become visual focal points. How the shelves are supported and finished also impacts installation and durability.
Floating Shelves Designs
Floating shelves are mounted with hidden brackets, creating a sleek, modern appearance. They work well for displaying books, plants, or decor without visible supports. The key is using sturdy wall anchors or stud mounts to ensure stability and weight capacity.
Materials vary from solid wood to engineered MDF. Thickness affects the shelf’s strength and visual weight—thicker boards handle more load but appear bulkier. Floating shelves can be arranged in simple horizontal lines or staggered patterns for visual interest.
Brackets and Support Styles
Shelf brackets come in metal, wood, or plastic, each offering different durability and style options. Metal brackets provide a strong, industrial look suitable for heavy storage. Wooden brackets can be carved or shaped to match rustic or traditional decor.
Support styles include L-shaped, decorative scrolls, or minimalist hidden brackets. The choice depends on load requirements and desired appearance. Proper bracket placement and secure wall attachment are critical for shelf safety and longevity.
Creative Shapes and Layouts
Shelves don’t have to be rectangular or straight; geometric shapes like hexagons, triangles, or asymmetrical configurations add artistic appeal. Clustered layouts can form patterns or grids, maximizing space and creating visual interest.
Layering shelves at varying depths and heights enhances dimension and usability. Incorporating open and closed sections or mixing shelf sizes allows storage of different item types. Planning for balanced weight distribution prevents sagging and stress on the wall.
Customization with Paint and Finishes
Paint and finishes personalize shelves to complement the room decor. Matte, satin, or gloss finishes change surface texture and reflectivity. Using colored paint can match or contrast wall colors, making shelves blend in or stand out.
Wood stains highlight natural grain while protecting against moisture. Clear varnishes or polyurethane increase durability for high-use areas. Finish selection should align with shelf material and intended environment, such as moisture resistance in kitchens or bathrooms.
Gathering Tools and Supplies
To build custom wall shelves, having the right tools and materials is essential. The correct hand and power tools will make your work precise and efficient. Equally important are the hardware components that ensure the shelves are stable and securely attached to the wall.
Essential Hand Tools and Power Tools
Start with a measuring tape and a pencil for marking dimensions on wood. A level ensures that the shelves will be perfectly horizontal. For cutting, a circular saw or miter saw provides clean and straight cuts. A drill with various drill bits is necessary for pilot holes and driving screws.
Additional helpful tools include a stud finder to locate wall studs, a clamp set to hold pieces steady when assembling, and sandpaper or a power sander to smooth surfaces. Using a screwdriver set or a power screwdriver speeds up fastening tasks. These tools form the basic kit needed for both preparation and assembly of wall shelves.
Required Hardware and Fasteners
The right hardware supports shelf stability and safety. Start with wood screws sized appropriately for your shelf thickness and wall stud depth. If mounting on drywall without studs, use wall anchors or toggle bolts rated to hold the shelf’s weight.
Brackets or floating shelf supports hold the shelf structure in place. Choose metal brackets for heavy loads or decorative wooden corbels for lighter shelves. Don’t forget corner braces if additional reinforcement is needed.
Keep washers on hand to distribute screw pressure evenly and prevent damage to your wood. Selecting hardware rated for the intended load and shelf size is critical for durability.
Step-by-Step Building Guide
Start by selecting and measuring the wood carefully to match your desired shelf dimensions. Preparing the surfaces thoroughly will ensure a clean look and strong finish. Finally, use precise drilling and assembly methods to create sturdy, level shelves.
Cutting Shelf Boards to Size
Measure your wall space accurately before cutting. Mark the wood boards with a pencil and a square to maintain straight lines. Use a circular saw or miter saw for clean, precise cuts, making sure the blade is sharp to avoid splinters.
Cut the boards slightly longer than needed if you plan to trim after assembly for a perfect fit. Always wear safety goggles and ear protection during cutting. Support the board firmly on a stable surface to prevent movement.
Sanding and Surface Preparation
After cutting, sand all surfaces with medium-grit sandpaper (around 120 grit) to remove rough edges and splinters. Follow with fine-grit sandpaper (220 grit) for a smooth finish. Sand along the wood grain for best results.
Wipe the boards with a damp cloth to remove dust before applying paint or stain. Fill any holes or imperfections with wood filler, then sand smooth once dry. Proper surface prep improves adhesion and final appearance.
Drilling and Assembly Techniques
Pre-drill holes for screws to prevent wood from splitting. Use a drill bit slightly smaller than the screw diameter. Countersink holes if you want screw heads flush with or below the surface.
Assemble the shelves using wood screws or brackets for reinforcement. Check alignment with a level before securing. Tighten screws evenly but avoid overtightening, which can damage the wood. Clamp pieces if necessary to hold them steady during assembly.
Mounting Shelves Safely and Securely
Ensuring your shelves are strong and stable depends on proper placement and the right hardware. Paying close attention to stud locations, anchors, and precise leveling will provide durability and prevent damage.
Locating Wall Studs
Wall studs offer the strongest support for shelves. Use a stud finder to locate them, moving it slowly across the wall to detect wooden beams behind drywall. Mark the edges of each stud at shelf height with a pencil.
Studs are usually spaced 16 or 24 inches apart. If you can’t find a stud where you want the shelf, consider adjusting your placement. Screwing directly into drywall without a stud reduces shelf stability and increases the risk of wall damage.
Installing Wall Anchors
If no studs are available, use wall anchors rated for the shelf’s weight. There are various types — such as toggle bolts, molly bolts, and plastic anchors — each suited to different wall materials.
Toggle bolts spread support behind the drywall. They are strong but require larger holes.
Molly bolts expand behind the wall and offer a robust grip.
Plastic anchors are simpler but best for lighter loads.
Insert anchors according to package instructions, ensuring a snug fit before attaching brackets or screws.
Leveling and Spacing Considerations
Use a level tool to mark a horizontal guideline before installation. This step prevents tilted shelves that can cause items to slide or fall. Measuring from the floor and checking with a spirit level ensures consistency.
Spacing shelves evenly creates a balanced look and maximizes storage. Consider what items will be stored to determine ideal vertical distances — typically 12 to 16 inches apart for books or decor. Double-check all measurements for uniformity before drilling.
Finishing Touches and Styling Tips
Finalizing your custom wall shelves involves protecting the wood and enhancing its appearance. Careful application of finishes prevents damage and adds character. Thoughtful styling highlights both functionality and design.
Applying Sealants or Paint
Choose a sealant or paint based on the shelf’s environment and material. For wood, polyurethane or water-based sealants protect against moisture and scratches. Apply thin, even coats with a brush or foam applicator, allowing drying time between layers.
If painting, start with a wood primer for better adhesion. Use high-quality latex paint for durability. Two or more coats may be needed for solid coverage. Sand lightly with fine-grit paper between coats to ensure smoothness.
Avoid rushing the process; proper drying and curing improve the shelf’s longevity. Seal both visible and hidden surfaces to prevent warping or moisture damage.
Decorative Accents and Shelf Organization
Styling shelves balances aesthetics and usability. Use items like framed photos, small plants, books, and unique collectibles to add personality. Arrange items asymmetrically for visual interest while maintaining groupings by theme or size.
Consider functional storage solutions like baskets or decorative boxes for clutter control. Use shelf risers or bookends to maximize vertical space. Leave some empty space to avoid overcrowding and make cleaning easier.
Mix textures—wood, metal, fabric—for depth. Prioritize items you want to highlight near eye level. Rotate decor seasonally or as your collection changes to keep the look fresh.
Maintenance and Care for Custom Shelves
Proper care extends the lifespan and appearance of your custom wall shelves. Regular cleaning tailored to the shelf material and routine stability checks prevent damage and ensure safety.
Cleaning Methods for Different Materials
Wood shelves should be dusted weekly using a soft, dry cloth. For stains, use a slightly damp cloth with mild soap, then dry immediately to avoid water damage. Avoid harsh chemicals or abrasive sponges, which can strip finishes.
Metal shelves are best cleaned with a damp cloth and mild detergent. Remove any rust spots promptly with fine steel wool or rust remover. Dry thoroughly after cleaning to prevent corrosion.
Glass shelves require non-abrasive glass cleaner sprayed onto a cloth, never directly on the glass. Wipe to remove smudges or dust and avoid scratching with rough materials.
Periodic Checks for Stability
Inspect shelf brackets and anchors every 3-6 months to confirm they remain securely fastened. Tighten any loose screws with the appropriate screwdriver or wrench. Check for wall damage or signs of stress, like cracks or sagging.
Test shelf load capacity by evenly distributing weight and monitoring for bending or movement. Replace any damaged supports immediately to prevent accidents. If shelves hold heavy items, increase inspection frequency.
Troubleshooting Common Issues
If shelves appear uneven or slanted after installation, start by checking the level. Use a spirit level to ensure brackets are aligned horizontally. Adjust screws or reposition brackets as needed.
When shelves do not support weight properly, confirm that anchors or wall studs are used correctly. Drywall alone may not sustain heavy loads. Use appropriate anchors for the wall type and shelf material.
If shelves wobble or feel unstable, tightening screws and brackets typically resolves this. Inspect all hardware for loose fasteners. Replace any bent or damaged parts to improve stability.
Uneven paint or finish might occur during the final step. Apply paint or stain evenly with smooth strokes. Allow each coat to dry fully before applying the next to avoid blotches.
In cases where drilling hits electrical wiring or plumbing, stop immediately. Use a stud finder with wiring detection to avoid damage. If unsure, consult a professional before proceeding.
| Issue | Common Cause | Solution |
| Uneven shelves | Improper leveling | Use a spirit level; adjust |
| Poor weight support | Wrong anchors or studs | Use correct anchors/studs |
| Shelves wobble | Loose screws or brackets | Tighten hardware; replace |
| Uneven finish | Improper painting technique | Apply evenly and dry well |
| Hitting wiring/plumbing | Inadequate detection | Usea stud finder; consult a pro |